How to Hang Art Prints: Heights, Spacing, Tools, and the Mistakes to Avoid
The honest, hole-by-hole guide to getting your art on the wall straight, level, and at the right height the first time.

Drilling into a wall is one of those small, irreversible acts that turns confident adults into cautious puddles. You measure twice, then a third time, then suddenly you are standing on a chair holding a frame at arm's length wondering if 145cm is from the floor or from the skirting board. This guide is the practical, slightly opinionated version of how to get it right.
The 57-inch rule: what it means, and when to ignore it
The professional consensus is that art should be hung so its centre sits at 145cm (roughly 57 inches) from the floor. This is the rough average eye level for adults and it's the standard galleries use. The centre of the artwork, not the top, not the hook.
To find your nail position, you measure from the top of the frame down to the taut hanging wire or D-rings, then add that distance above 145cm. So if your frame is 60cm tall, the top sits roughly 30cm above the centre line, and the nail goes a few centimetres lower than that depending on how much the wire pulls down.
Now, when to ignore it. In a sitting room where you mostly view art from the sofa, drop everything to 140cm or even 135cm. Your eye line is lower when seated, and art hung at standing eye level can feel like it is floating above your sight line. Hallways, kitchens and entryways are standing rooms, so 150 to 165cm works better. Low ceilings? Drop the centre line. Very tall ceilings? Resist the urge to push art skyward. It still needs to relate to humans, not architecture.
The fastest sanity check: have someone hold the frame against the wall while you sit, stand or walk where you actually view the room. If it feels right there, it is right.

Tools you actually need
Most hanging jobs need less kit than the internet suggests. The non-negotiables:
- A tape measure (not a ruler, not your phone)
- A pencil
- A spirit level. A small 20cm one is fine. A phone level app works in a pinch but a real bubble level is faster
- A hammer for picture hooks, or a drill if you are going into brick or concrete
- Picture hooks, wall plugs, or screws appropriate to your wall (more on this below)
Useful but not essential: a stud finder (cheap ones from any hardware shop work fine for plasterboard), a laser level for gallery walls, painter's tape for marking without pencil scuff, and brown paper or old wrapping paper for templates.
The toothpaste trick is genuinely brilliant. Dab a tiny bit of toothpaste on the back of the hanging hook, press the frame against the wall where you want it, and the toothpaste leaves a perfect mark for your nail. Wipes off in seconds.
Wall types: each one wants a different fixing
Walls in British homes are not all the same, and the wrong fixing is the difference between art on the wall and a chunk of plaster on the floor.
Plasterboard (most modern interior walls)
Tap the wall. If it sounds hollow, it is plasterboard. Standard picture hooks (the brass ones with the angled pin) hold up to about 7 to 9kg, which covers most prints up to 50x70cm comfortably. For anything heavier, use a self-drive plasterboard anchor or a butterfly toggle, both of which can take 15 to 20kg.
If you can find a stud (the vertical timber behind the plasterboard) and screw directly into it, you can hang almost any frame safely. Stud finders make this easy. Otherwise, knock along the wall: studs sound solid, the gaps between sound hollow.
Brick and masonry
Older homes, exterior walls, and chimney breasts are usually brick. You need a masonry drill bit, a wall plug (the red ones for light loads, brown for heavier), and a screw. Drill the hole, tap in the plug, drive the screw in until about 5mm sticks out, hang the frame. Brick will hold serious weight, easily 20kg+ with the right plug.
Concrete
Common in flats and newer builds. Treat it like brick but expect to work harder. You need an SDS or hammer drill, a proper masonry bit, and either a heavy-duty wall plug or a concrete screw. For heavy frames, sleeve anchors or toggle bolts rated for concrete are worth the extra few quid.
A note on rentals: Command strips genuinely work for prints up to about 2kg, which covers most unframed art prints and small frames. Use the large strips, follow the instructions on cure time (most need 30 minutes pressed firmly), and do not try to cheat the weight rating. They will not hold a 70x100cm framed print, no matter what the packaging suggests.
Hanging heavy frames safely
Larger framed prints, especially those at 70x100cm with solid wood frames and acrylic glazing, can be heavier than you expect. Weigh your frame on the bathroom scales before you start so you know what you are working with.
For anything over 5kg on plasterboard, use two hooks spaced roughly a third of the frame's width apart. Two hooks do three useful things: they double the weight capacity, they stop the frame from tilting over time, and they give you a small margin to nudge the frame perfectly level. Picture wire alone is the main reason frames drift crooked within weeks.
For frames over 10kg, get into a stud or use proper toggle bolts. This is not the place to economise on a £1.50 picture hook.
Our framed art prints ship with fixtures already attached and the print properly fitted inside the frame, so you are not bodging together hardware from three different sources. The frames are solid FSC wood with UV-protective acrylic glaze rather than glass, which means they weigh less than the equivalent glass-fronted frame, but they still deserve proper fixings.

Canvas prints: lighter than you think
People routinely over-engineer the fixings for canvas. A stretched canvas print is essentially printed poly-cotton over a wooden frame, with no glass or acrylic adding weight. Even a 100x150cm canvas weighs less than a medium-sized framed print at half the size.
For most canvases, a single picture hook into plasterboard is plenty. The trick to hanging them level is that canvases do not always come with a wire, just two D-rings or sawtooth hangers on the back of the stretcher bars. Measure the distance between the two D-rings precisely, mark two points on the wall at exactly that distance, level them with a spirit level, and put a hook or nail at each point. Two-point hanging keeps canvas dead level forever.
If you want a more polished look, canvases can be framed in a floater frame, which adds a thin border around the canvas without covering the edges. Worth knowing if you are torn between framed and unframed.
Spacing for multiple prints: the 5cm rule
When you hang two or more prints together, the gap between them does most of the work. Too far apart and they look like unrelated prints sharing a wall. Too close and they feel cramped.
The reliable rule: 5cm between frames for most pairings, up to 8cm for very large prints. Any tighter and frames look like they are arguing with each other. Any wider and your eye stops grouping them together.
For a proper gallery wall, keep the spacing identical between every print. Equal gaps are what make a wall look intentional rather than chaotic. Use a piece of cardboard cut to 5cm as a spacer when you are positioning, rather than trying to measure each gap with a tape.
If you are pulling together a set, our wall art sets are sized to work as a group, which removes a lot of the maths.
The paper template method: zero holes until you are sure
This is the single technique that will save you the most regret. Cut a piece of brown paper or old wrapping paper to the exact dimensions of your frame. Mark on the paper where the hanging hook or D-rings sit on the back of the actual frame.
Tape the paper template to the wall with painter's tape. Step back. Sit on the sofa. Look at it from the doorway. Move it 5cm left. Move it back. Live with it for an hour if you need to.
When you are certain, push your nail or drill bit straight through the marked spot on the paper. Tear the paper away. Hang the frame. The nail is exactly where it needs to be.
For multiple prints, cut a template for each one, tape them all up at once, and arrange the entire layout on the wall before a single hole is drilled. This is how interior designers do it. It is genuinely foolproof.
Above furniture: the 15-20cm gap rule
Art hung over a sofa, bed, or sideboard needs to feel connected to the furniture, not floating above it like a lost balloon. The rule is 15 to 20cm between the top of the furniture and the bottom of the frame.
Closer than 15cm and the art reads as part of the sofa, which can feel cluttered. Further than 20cm and your eye sees a gap of empty wall, which makes the art look unmoored. The 145cm centre rule still applies, but if it conflicts with the 15-20cm gap rule, defer to the gap. Furniture sets the visual anchor.
The other consideration is width. Art above a sofa or sideboard should be roughly two-thirds the width of the furniture below. A 200cm sofa wants a piece (or grouping) around 130 to 150cm wide. If your single print is too small, group it with one or two more rather than hanging it solo and looking marooned.
This is where living room art prints and bedroom art prints sized for above-furniture placement do most of their work.

The 7 most common hanging mistakes
These are the recurring problems we see. Avoid them and your walls instantly look better.
1. Hanging it crooked. Always use a spirit level. Eyeballing it never works. If the frame uses wire, use two hooks rather than one to stop it drifting over time.
2. Hanging it too high. The most common mistake by miles. People default to hanging art at their own standing eye level when they are about to drill. Drop everything to 145cm centre, lower in sitting rooms.
3. Hanging art that is too small for the wall. A 30x40cm print over a three-seater sofa will always look apologetic. Go bigger, or group multiple prints. A good rule: when in doubt, size up.
4. Wrong fixings for the wall. A picture hook in concrete will not work. A masonry plug in plasterboard will spin uselessly. Identify the wall first, then pick the hardware.
5. Wrong spacing between prints. 12cm gaps in a gallery wall break the grouping. Stick to 5cm and use a cardboard spacer.
6. Wrong height above furniture. A 40cm gap between the sofa and the frame makes the art look like it ran away from home. Stick to 15-20cm.
7. Ignoring sight lines. Art that looks great when you are standing 30cm away can vanish from the sofa where you actually live. Always check the view from where you will see it most.

A final word
The biggest hanging anxieties are about getting it wrong, and the paper template method removes almost all of that risk. Spend ten minutes with brown paper and painter's tape before you reach for the drill. Identify your wall type before you buy fixings. Measure to the centre of the frame, not the top. And if you are hanging anything substantial, two hooks beat one every single time.
Browse art prints and picture frames when you are ready to plan the next wall. The hammer can wait until the paper is up.

Productos Fab destacados en este blog
-

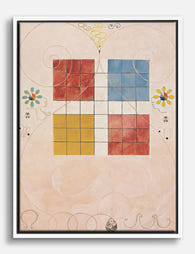
Lámina Hilma af Klint los diez más grandes
Translation missing: es.products.product.sale_price Desde €16,95€23,95 -
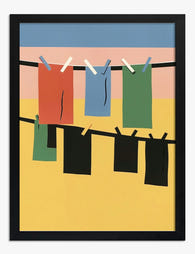
Lámina ropa tendida de colores
Translation missing: es.products.product.sale_price Desde €16,95€23,95 -
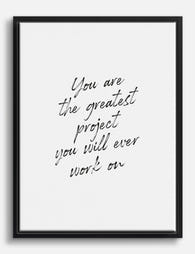
Lienzo frase motivadora minimalista
Translation missing: es.products.product.sale_price Desde €64,95€92,95 -

Lienzo senderistas en ascenso en blanco y negro
Translation missing: es.products.product.sale_price Desde €64,95€92,95 -

Lienzo los diez más grandes de Hilma af Klint
Translation missing: es.products.product.sale_price Desde €64,95€92,95 -
Lámina reflejo a rayas
Translation missing: es.products.product.sale_price Desde €16,95€23,95 -

Lienzo geométrico estilo Bauhaus azul y blanco
Translation missing: es.products.product.sale_price Desde €64,95€92,95 -

Lámina retrato elegante a rayas
Translation missing: es.products.product.sale_price Desde €16,95€23,95 -

Lámina pila de libros de colores
Translation missing: es.products.product.sale_price Desde €16,95€23,95 -

Lámina retrato a rayas con actitud
Translation missing: es.products.product.sale_price Desde €16,95€23,95 -

Lámina guía clásica de normas del baño en blanco y negro
Translation missing: es.products.product.sale_price Desde €16,95€23,95 -

Lienzo geometría Bauhaus verde profundo y crema
Translation missing: es.products.product.sale_price Desde €64,95€92,95 -
Lienzo los diez mayores de Hilma af Klint
Translation missing: es.products.product.sale_price Desde €64,95€92,95 -

Lienzo perspectiva de las copas de los árboles en blanco y negro
Translation missing: es.products.product.sale_price Desde €64,95€92,95 -
Lienzo los diez mayores de Hilma af Klint
Translation missing: es.products.product.sale_price Desde €64,95€92,95 -

Lienzo corazón en tonos tierra para empoderar tu espacio
Translation missing: es.products.product.sale_price Desde €64,95€92,95 -

Lámina bajo las copas de los árboles en blanco y negro
Translation missing: es.products.product.sale_price Desde €16,95€23,95


Más de The Frame

The Acanthus Leaf in William Morris's Work: His...
The acanthus leaf has decorated Western buildings for over two thousand years, but William Morris was the designer who finally made it move. His 1875 Acanthus pattern took a stiff,...

How to Style William Morris Moon Prints in Ever...
Morris's celestial work sits in a strange, lovely place: vintage botanical detail meeting deep indigo skies and burnished gold. That makes it more flexible than most decorative prints, but also...

Animals in the Arts and Crafts Movement: How Mo...
The Arts and Crafts movement gave us some of the most enduring animal imagery in British design. But Morris, Voysey, and De Morgan each saw nature differently, and understanding those...