How to Build a Botanical Gallery Wall That Actually Looks Intentional
A step-by-step framework for arranging plant prints that look curated, not crowded, even if you've never hung a gallery wall before.

Most botanical gallery walls fail for the same reason: too many prints, too many plant types, too many frame finishes. The fix is structural, not aesthetic. This guide gives you a layout formula, a curation method, and the measurements you need to get it right the first time.
Why botanical subjects make the best gallery walls
Botanicals are forgiving in a way other subjects aren't. The colour palette tends to sit in a narrow range (greens, creams, soft browns, the occasional muted bloom), which means individual prints harmonise even when their styles differ. A vintage fern illustration and a modern monstera silhouette won't fight each other the way a film poster and an abstract would.
They also scale beautifully. Plants exist at every size in nature, so your eye accepts a small cactus print next to a sprawling banana leaf without registering it as odd. Try that with portraits and the proportions feel wrong instantly.
The other quiet advantage: botanicals work in almost every room. Bathrooms, kitchens, bedrooms, hallways, lounges. They're decorative without being demanding, which is why botanical wall art tends to be the safest starting point for anyone nervous about gallery walls.

Pick your anchor: starting with one large statement plant print
Every successful gallery wall has a piece that does the heavy lifting. Without it, you end up with a scattered grid of equally-weighted prints and nowhere for your eye to land. This is the single biggest reason botanical walls look cluttered.
Your anchor should be your largest print, ideally 70x100cm or close to it, and it should feature a single bold subject. A monstera leaf on a pale background. A banana palm. A large fern frond. Avoid busy compositions or anything with multiple smaller plants crammed into one frame, your anchor needs to feel calm.
Position the anchor slightly off-centre on your wall, not dead middle. Off-centre placement signals "curated" to the brain, while perfect symmetry signals "showroom." Once the anchor is decided, every other print is chosen in relation to it.
A practical note on size: people consistently underestimate how large their anchor should be. If you're hanging above a sofa, your anchor wants to be roughly two-thirds the width of the sofa, or paired with a second large piece to span that distance. Too small and the whole wall looks apologetic.
Mixing subjects without chaos: monstera meets fern meets potted cactus
This is where most botanical walls go off the rails. People buy whatever plant prints they like individually, hang them together, and end up with what we call a plant salad: tropical leaves next to desert succulents next to English wildflowers, all shouting in different visual languages.
The rule we use: pick two related botanical "families" and stick to them. Not literal botanical taxonomy, just visual families.
Compatible pairings that work:
- Tropical foliage (monstera, banana, palm, philodendron) with tropical foliage
- Vintage scientific illustrations (any plant, as long as the style matches) with other vintage scientific illustrations
- Modern minimalist line drawings (single-stem ferns, simple leaves on white) with other modern minimalist line drawings
- Pressed flower or herbarium-style prints with other pressed flower prints
- Desert plants (cactus, agave, succulents) with other desert plants
Pairings that fight:
- Tropical leaves with desert cacti (different climates read as different worlds)
- Vintage botanical illustrations with modern flat-colour graphics
- Photorealistic flower photography with stylised leaf drawings
The exception: black and white prints. If everything is monochrome, you can mix subjects more freely because the colour treatment unifies them. A black and white monstera, a black and white cactus, and a black and white wildflower can coexist if the line weight and printing style match.
For most people, the safest approach is to commit to one stylistic direction. Browse houseplant prints if you want a modern, lived-in feel, or lean into vintage illustrations if you want something that reads more library-than-jungle.
The 2-3-5 layout rule for botanical gallery walls
Here's the framework. For a balanced botanical gallery wall, you want 2 large prints, 3 medium prints, and 5 small prints, for a total of 10 pieces. This ratio creates visual hierarchy automatically, which is what makes a wall feel intentional rather than thrown together.
The breakdown:
- 2 large (60x80cm or 70x100cm): your anchor and a secondary large piece. Together they establish the wall's visual weight.
- 3 medium (40x50cm or 50x70cm): these bridge the large pieces and the small ones, preventing the awkward jump in scale that makes walls look unbalanced.
- 5 small (30x40cm or 21x30cm): these fill the gaps and add the curated, collected-over-time feel.
You don't have to hit exactly ten. The principle is the ratio, not the count. A smaller wall might use 1-2-3 (one large, two medium, three small), and a larger wall might use 2-4-6. What matters is that you always have fewer large prints than medium, and fewer medium than small. That descending pyramid is what your eye reads as harmony.
The mistake almost everyone makes is using too many medium prints and not enough small ones. A wall full of 40x50cm frames looks like a chess board. The small prints are what break up the rhythm and stop it feeling repetitive.

Frame consistency: why one finish ties everything together
Pick one frame finish. Stick to it across every print on the wall. This single decision matters more for botanicals than for almost any other subject, because the prints themselves are visually varied (different leaf shapes, different scales, different green tones) and the frames are doing the work of unifying them.
Three finishes that work consistently well:
Natural oak or light wood. The most forgiving option, especially for tropical and modern botanical prints. Reads warm, contemporary, slightly Scandinavian. Works with almost any wall colour, particularly off-white, sage, or warm grey.
Black. The sharpest, most graphic option. Best for black and white botanicals, vintage scientific illustrations, or modern minimalist line drawings. Black frames make a wall look more like a curated collection and less like a soft, decorative arrangement. Avoid black if your prints have a lot of pale, washed-out backgrounds, the contrast can feel harsh.
Dark walnut or deep wood. The traditional choice for vintage botanical illustrations and herbarium prints. Gives a library feel. Best against painted walls in deeper colours like olive, navy, or cream.
What we'd avoid: gold, ornate, or mixed finishes. Gold can work for a single statement piece but rarely holds together across ten prints. Mixing finishes (some black, some wood) almost always reads as accidental rather than eclectic, no matter what styling guides claim.
A practical aside on quality: gallery walls live or die by frame consistency, and that means actual consistency, not "all roughly black." Frames from different sources, even in the same colour, often vary subtly in tone, depth, and finish. This is why we make our framed art prints in solid FSC-certified wood with the print fitted into the frame before it ships, so what arrives on your wall is genuinely matched, not approximately matched.
Spacing and height: getting the measurements right the first time
Most spacing problems trace back to two errors: prints hung too far apart, and prints hung too high.
Spacing between frames: 5 to 7cm between each frame, edge to edge. Closer than that and it looks crowded. Wider than 7cm and the prints stop reading as a single composition and start looking like individual pieces that happen to share a wall. Be consistent, the gap between every frame should be identical.
Height from the floor: the centre of your overall arrangement should sit at roughly 145cm to 150cm from the floor. This is the standard gallery hanging height, calibrated to average eye level. If you're hanging above furniture (a sofa, sideboard, bed), the bottom edge of your lowest frame should sit 15 to 20cm above the top of the furniture. Closer than 15cm and it looks cramped. Further than 20cm and the wall and furniture stop relating to each other.
The floor layout step: before you put a single nail in the wall, lay every frame out on the floor in front of the wall, in the arrangement you want. Move them around until the composition feels balanced. Then, and this is the part most people skip, take a photo on your phone. Looking at the layout through a camera flattens the perspective and reveals imbalances your eye misses in person. Adjust based on the photo, not on what you think looks right standing over it.
The paper template trick: cut out paper rectangles the exact size of each frame and tape them to the wall using painter's tape. Live with them for 24 hours. Walk past them in different lights. You'll catch problems (too high, too crowded, wrong anchor position) before you've drilled anything.

Starting small: a botanical wall art set of 3 as your foundation
A 10-piece gallery wall is intimidating. You don't have to start there. The smartest way to build a botanical gallery wall is to begin with three prints, hang them properly, live with them for a few months, and add from there.
A set of three works because three is the smallest number that creates rhythm rather than symmetry. Two prints feel like a pair (decorative). Three prints feel like a collection (intentional). And three is the ideal training ground for the 2-3-5 framework, you're essentially building the medium-print row first and adding the large anchor and small pieces later.
The starter formula:
- Three prints in matching frames, same finish
- All from the same botanical family (three tropical leaves, or three vintage ferns)
- Hung horizontally in a row, 5cm between frames
- Centred at 145cm from the floor
This is the foundation. Once it's up and you're confident in the look, you can add an anchor piece above or beside the row, then layer in smaller prints to flesh out the composition over time. Browsing wall art sets is often the easiest way to start, since the curation work is already done for you and the prints are designed to hang together.
The reason this scales well: every print you add later is chosen in relation to what's already on the wall, not in a vacuum. You'll make better decisions about the fourth, fifth, and sixth prints than you would have made trying to choose ten at once.

Common mistakes to avoid
A short checklist of the errors we see most often:
- Going too small overall. Most people hang prints that are roughly half the size they should be. If in doubt, size up.
- Mixing too many botanical families. Three plant families is too many. Pick two and commit.
- Inconsistent frame finishes. "Eclectic" rarely works. Match everything.
- Hanging too high. Centre at 145 to 150cm, not higher.
- Uneven spacing. Measure with a ruler, not your eye.
- Choosing prints that all have similar compositions. Five prints of single-stem leaves on white look like a wallpaper sample. Vary the compositions while keeping the style consistent.
A final note on canvas versus framed
For botanical gallery walls specifically, framed prints almost always look more intentional than canvas. The clean edge of a frame creates the visual rhythm that makes the 2-3-5 formula work. Canvas prints are excellent for single statement pieces, particularly large tropical leaves in living room wall art settings, but mixing canvas and framed in the same gallery arrangement tends to break the cohesion you're working to build.
If you want a softer, less formal botanical wall, you can hang multiple unframed canvases together, but treat that as a different project with its own rules, not as a variation of the gallery wall.
Start with three prints. Match the frames. Measure twice. The rest builds itself.

Produits Fab présentés dans cet article
-

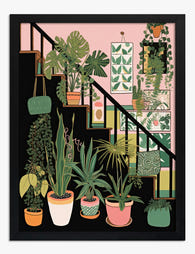
Toile escalier végétal
Translation missing: fr.products.product.sale_price À partir de CHF 62.00CHF 88.00 -

Toile escalier végétal
Translation missing: fr.products.product.sale_price À partir de CHF 62.00CHF 88.00 -
Affiche escalier botanique
Translation missing: fr.products.product.sale_price À partir de CHF 16.00CHF 22.00 -

Affiche botanique, plantes sur étagère, fond jaune
Translation missing: fr.products.product.sale_price À partir de CHF 16.00CHF 22.00 -

Affiche jardin en découpage végétal
Translation missing: fr.products.product.sale_price À partir de CHF 16.00CHF 22.00 -

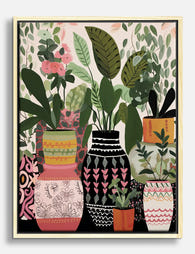
Affiche vases bohèmes aux motifs botaniques
Translation missing: fr.products.product.sale_price À partir de CHF 16.00CHF 22.00 -

Toile botanique vibrante
Translation missing: fr.products.product.sale_price À partir de CHF 62.00CHF 88.00 -

Toile botanique rose aux courbes fluides
Translation missing: fr.products.product.sale_price À partir de CHF 62.00CHF 88.00 -

Affiche plantes sur escalier
Translation missing: fr.products.product.sale_price À partir de CHF 16.00CHF 22.00 -
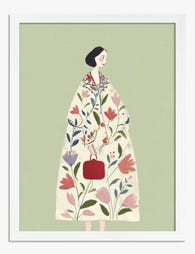
Affiche muse botanique
Translation missing: fr.products.product.sale_price À partir de CHF 16.00CHF 22.00 -
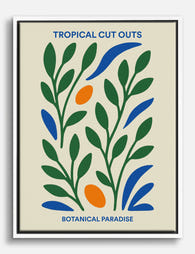
Toile paradis botanique aux formes découpées
Translation missing: fr.products.product.sale_price À partir de CHF 62.00CHF 88.00 -

Toile harmonie botanique
Translation missing: fr.products.product.sale_price À partir de CHF 62.00CHF 88.00 -

Affiche botanique bohème
Translation missing: fr.products.product.sale_price À partir de CHF 16.00CHF 22.00 -

Affiche botanique jardin d'herbes sauvages
Translation missing: fr.products.product.sale_price À partir de CHF 16.00CHF 22.00 -
Toile vases bohèmes à motifs botaniques
Translation missing: fr.products.product.sale_price À partir de CHF 62.00CHF 88.00 -

Toile merveilles botaniques
Translation missing: fr.products.product.sale_price À partir de CHF 62.00CHF 88.00 -

Affiche botanique bohème plantes vertes et pots
Translation missing: fr.products.product.sale_price À partir de CHF 16.00CHF 22.00 -

Affiche botanique tropicale en collage
Translation missing: fr.products.product.sale_price À partir de CHF 16.00CHF 22.00 -

Toile botanique vert héritage
Translation missing: fr.products.product.sale_price À partir de CHF 62.00CHF 88.00 -

Toile oasis botanique
Translation missing: fr.products.product.sale_price À partir de CHF 62.00CHF 88.00


Plus de The Frame

Every Flower in William Morris's World: A Guide...
William Morris designed roughly 50 wallpapers and around 30 chintzes across his career, and almost every single one features a plant. If you've ever stood in front of a Morris...

What Colours Go With Bouquet Prints? Pairings I...
You've found a bouquet print you love. Now you need to know if it will actually work above your sofa, opposite that mustard armchair, next to the curtains you spent...

Boho Sun Wall Art: How to Nail the Look Without...
Boho sun art has a reputation problem. Done badly, it screams student halls and macramé overload. Done well, it's one of the warmest, most grounding aesthetics you can put on...